Wednesday, July 26, 2023

Another electrical mystery

GM vehicles have a feature called Retained Accessory Power (RAP) that allows certain electrical accessories, such as the radio, to stay on for a short period of time after the engine is turned off. This is done to prevent the accessories from turning off suddenly, which could cause data loss or other problems.

The RAP feature is typically set to stay on for about 10 minutes after the engine is turned off. However, in some cases, the radio may stay on for longer, even after the doors have been opened. This can be caused by a number of factors, including:

• A problem with the RAP switch. The RAP switch is a small switch that is located in the driver's door. It tells the car's computer when the door is open or closed. If the RAP switch is faulty, it may not tell the computer that the door is open, which will keep the radio on.

• A problem with the body control module (BCM). The BCM is the computer that controls the electrical systems in the car. If the BCM is faulty, it may not be able to turn off the radio properly.

• A software problem. The software that controls the RAP feature may have a bug that causes the radio to stay on.

This is a weird setup to me. I believe that when you turn off the key all electrical things should shut down. If you want them on when the engine is off, then turn the key to the accessory position. That’s what it’s there for. But I’ve adapted to GM’s way of doing things.

Then, after getting the van back from the engine transplant, the radio no longer turned off when I opened the door. I had to turn it off myself. Hmmm, okay, so the RAP switch? The BCM? Something reassembled incorrectly? Sigh. So I adapted to that new reality.

Today, out of the blue, with no intervention from me or anyone else, it reverted to the GM standard way of doing things. Go figure.


Saturday, July 22, 2023

Darn otoliths

A few years ago I started having occasional brief episodes of vertigo. They usually happened when I was in bed. I’d turn my head from one side to the other and my world would start spinning. Woah, I’m on the Tilt-A-Whirl!

The vertigo would last only a few seconds, so after a few of these incidents I settled into just letting them run their course. After all, I was already lying down and safe. Sometimes it would happen when I sat up to get out of bed. I would just flop back down and wait.


My type of vertigo is caused by tiny crystals called otoliths in my inner ear wandering into one of the fluid-filled position-detecting tubes that help us maintain balance. 

I learned all that this morning after googling information on vertigo, because an attack that had started as soon as went to bed last night was still going on. Besides finding out the cause, I also learned there’s a series of “exercises” sufferers can do to get the rogue otoliths back where they belong. They involve hanging your head off the end of the bed and holding your head in various positions. It helped, but I’m still not 100 percent. At least I’m not stumbling around and crashing into things.

Friday, July 14, 2023

I’m not all amped up

I’ve been on hold with customer support for too long, so maybe one of my solar-savvy readers can tell me why my two 200W panels are putting out plenty of volts but no amps.

UPDATE

After emailing, live chatting, manual rereading, forum browsing, some fiddling and a lot of hokey-pokey I got my solar contraption working. For now, but I don't know for how long. Ergh, electricity.

Tuesday, July 11, 2023

Solved that problem

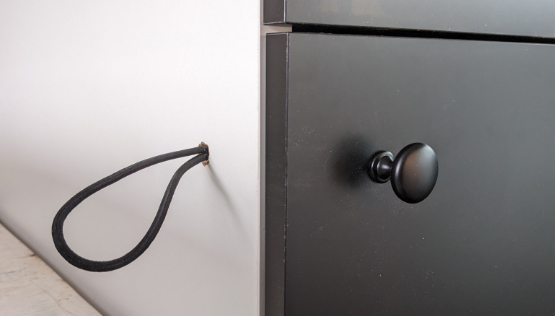
Kitchen cabinets were intended to live sedentary lives, not to ride around in the back of a van. So drawers and doors have a tendency to open up and spill their contents when I’m trying to beat a left turn light.

My former cabinet had a functionally simple but aesthetically unappealing mechanism: cup hooks I would turn to grab the edge of the doors. I wanted something for my new cabinet that was nicer yet just as easy to use.

The soft closing feature of my Ikea cabinet isn’t good for keeping things closed. And I knew from past testing that magnetic latches weren’t enough against the force of several sliding cans of creamy tomato basil soup. I considered all the latches and hasps in several hardware stores. I dug through specialty catalogs online, but… nah.

Then I remembered a trick my nomadic friend Karin showed me. She uses bungee cords looped between the knobs on her cabinet doors. I don’t have facing doors, but I could approach it a different way. 


Voila! Now I just need to get more bungee cord for the drawers. 

I know the drawer police will be after me for not locating the knobs in the center of the drawers, but that’s the type of outlaw I am.

UPDATE: Got enough bungee stuff to do the drawers.


Monday, July 10, 2023

And in this corner...

 Cargo vans don’t have nice moldings covering all the wiring like passenger vans do. So the back corners of the Rolling Steel Tent are a bit of a mess. Not only are there the standard wires for taillights and such, there’s also what I’ve added: back up camera, antenna cable, cellular booster, overhead light… 

Finally, after ten years of trying to ignore all that, I made a simple panel to cover it. Ah, that’s better. Hmmm, maybe I should paint the back of that cabinet.

Sunday, July 9, 2023

Going fancier

The original cabinet I built from scratch ten years ago functioned just fine, but there were some funky bits and some obvious flaws. I tried to fix those things as part of my upgrade, but I ended up making things worse. Sigh.

So rather than build a replacement, I explored pre-made cabinets, hoping to find something that would fit in the former cabinet’s space. And, surprise, Ikea had what I needed. I’d have to modify it to clear the fuel filler bump, but that would have been the case with any cabinet. (What, kitchens don’t have weird sticking out thingies?)

I had to pick up the kit at Ikea’s Albuquerque warehouse. There were seven or eight packages, which made carrying them much easier. 

The world is filled with jokes about assembling Ikea stuff. I’ve never had problems before. The trick this time was doing a large, awkward assembly single handed. 

The drawers were easy. Screw a couple of tabs to the drawer face, then snap the rest together. And the door hinges clicked into place. No problem. (I thought.)

In order to measure the cutout for the fuel filler, I had to partially assemble the 24 x 24 x 30 box, then get it into and out of the van without damaging it. It’s cumbersome, heavy and slippery.

In the meantime, we had the estate sale, selling off all of Lou’s tools. No more saws. But our neighbor friend Pat has an even better shop and she let me use it. I notched the base, back and side then built a box to close it in. Although Pat’s power tools are top notch, she doesn’t have many clamps. So I had to wait for one joint to dry before I could do the next. But it worked out.

Then the van was in the shop for the new engine and I couldn’t do measurements and test fits.

The top for the cabinet is separate and I decided I wanted to use butcher block. Lowe’s in Las Cruces had them in four-foot lengths an inch-and-a half thick—and about 5,000 pounds. 

“Hey Pat, Lowe’s wouldn’t cut the butcher block to size. They said it was too thick. Any chance your table saw can handle this slab?”

“I don’t know. Let’s try.” It worked and now Pat has the unneeded chunk of butcher block.

Then I had to decide how to finish the wood. If I wanted to use the butcher block for actual butchering I treat it with the proper waxy oil stuff. But I just need water resistance, so I went with some tinted polyurethane—after a lot of sanding.

The original plywood cabinet was made with plywood on a poplar frame. But melamine-covered medium density fiberboard is more brittle, and there was a chance the vibrations of driving—particularly on dirt roads—would cause damage. So in addition to Ikea’s fasteners, I glued the panels together, used more screws, ran a bead of super glue along all the seams, and added glued and screwed poplar reinforcements to the joints. It’s very rigid now.

Also, the original cabinet had been secured by a bolt through the van floor plus a couple more bolts attaching it to the end or the bed. But this time (partly because there was no one handy to hold one end of the bolt while I crawled under the van to tighten it) I attached it to the bulkhead.

Once the box was in place I could mount the butcher block and install the drawers and door. No problem with the butcher block. Just some marking of holes and drilling them, then using some lag bolts to secure it to Ikea’s brackets. But, oops, there was a problem with the drawers. There was a large gap between the drawer face and the butcher block. I thought I had screwed the slides into the wrong holes, so I unscrewed them and moved them up. But then the drawer was too high. I finally realized I had installed the faces upside down. So I returned the slides to their original position and… How the hell do I get the faces off the drawers? They snapped in, but how do I unsnap it? After about an hour of poking around in various holes (worried that I’d need to buy two more drawers) I finally found the secret combination! Whew!

So now it’s all done, except I need to mount the knobs, adjust the drawer and door gaps, and notch the shelves to clear my custom corner bracing. One more trip to Pat’s shop. Good thing it’s only a half mile away.